DIY Christmas Gnomes Gift Tags With Cricut and a Christmas Gnomes SVG Cut File
This post contains affiliate links which means that at no cost to you, I may earn a commission if you purchase using one of my links. For more information view my full disclosures.
~
I wanted to show you how to make DIY Christmas Gnomes Gift Tags With Cricut, Silhouette, or another vinyl cutter and a Christmas Gnomes SVG Cut File. Christmas gnomes are popular every year and there’s no wonder why! Christmas gnomes are just the cutest!
I love my Cricut Maker so much and I use it a lot around Christmas. I think it’s so fun to make DIY Christmas gift tags with my Cricut. The Christmas Gnomes SVG cut file had so many cute designs!
This particular Christmas craft project is a two-for-one! You can use them for gift tags or ornaments for the tree. Use the gnome SVG file to make signs, mugs, Christmas shirts, and more.
Dress up plain kraft gift wrap with one of these cute DIY gnome gift tags. I also have a tutorial about how to make a bow out of wrapping paper.

Where To Buy The Christmas Gnomes SVG File
I love this Christmas gnome SVG cut file that I used. It’s so easy to resize it to fit the tags you’re making.
I’ve bought SVG files from this seller before. I purchased the Cricut flower SVG file for my Easy Paper Flower Wreath with Cricut. The files always cut so nicely.
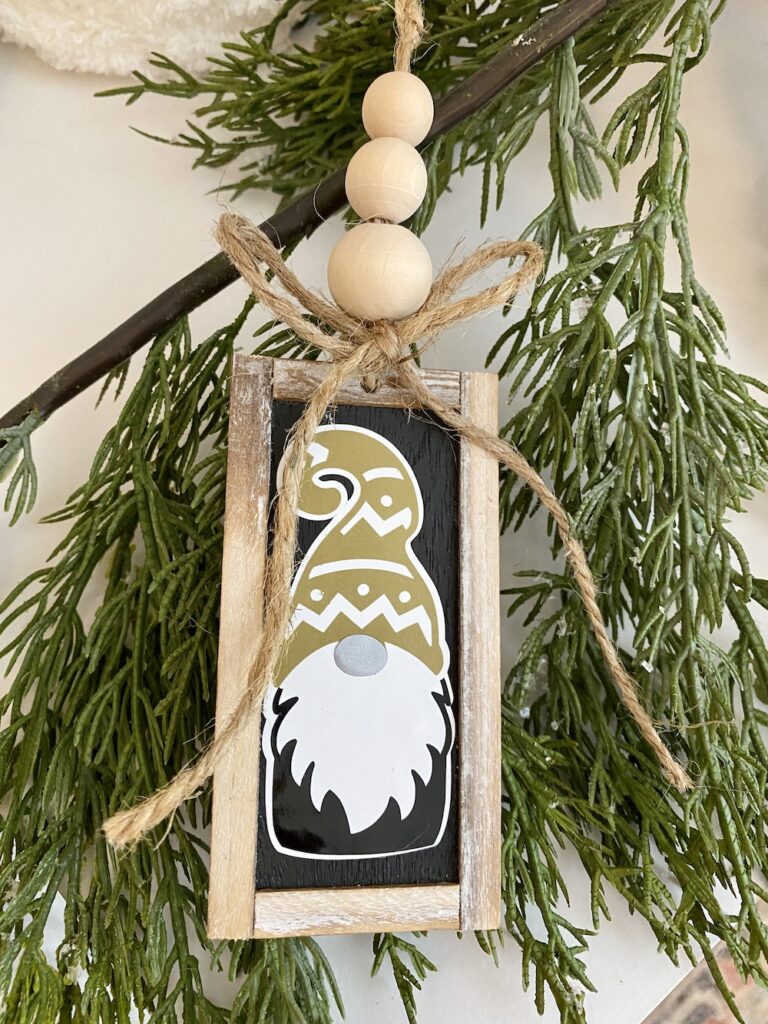
What I love about this Scandinavian Christmas gnomes SVG cut file is that it comes with the option to have a punched hole for hanging, or you can cut the vinyl without a hole to use on a premade tag as I did. Both options are included for all of the SVG Christmas Gnomes. The file also comes with Christmas Gnomes SVG, DXF, EPS, PDF, and PNG files.
How To Layer 4 Colors of Vinyl
If this is the first time layering different colors of vinyl with your Cricut, don’t be afraid. With the right materials, it’s a piece of cake. The exact gift tags I used were in my craft stash for years so I can’t find that link, but I found so many other gift tags for you. I’m sure you can find them at Hobby Lobby or any craft store as well.
These DIY gnome gift tags and/or ornaments use 4 colors of premium vinyl. You can use three if you don’t care if the nose matches the hat, but I liked the look of four. If you’ve been following me for a while, you know I love neutral colors so I chose white as layer 1, black as layer 2, gold as layer 3, and silver as layer 4.
What is transfer tape?
Transfer tape is a magical tape that helps you pick up a weeded design and then place it on your surface without getting the design stuck to itself. Transfer tape keeps letters and intricate designs together in their perfect shape.
Weed all of your layers and leave them stuck to their paper backing, lay a piece of transfer tape on the first layer (white in my picture), and use a scraper or credit card to get the vinyl to stick to the transfer tape.
Slowly lift the design making sure all of the pieces are transferred to the transfer tape. Lay the layer on your surface and use the scraper again to transfer the vinyl onto the tag. Peel the transfer tape off making sure all of the vinyl pieces are stuck to the tag. I only used one piece of transfer tape for the entire design.
Most transfer tape is clear but I used a piece of blue transfer vinyl so you could see what I’m doing better.
The Right Transfer Tape For Layering Vinyl
See-through transfer tape works best for layering vinyl so you can easily line up the designs. They also make transfer paper, but it’s hard to see through.
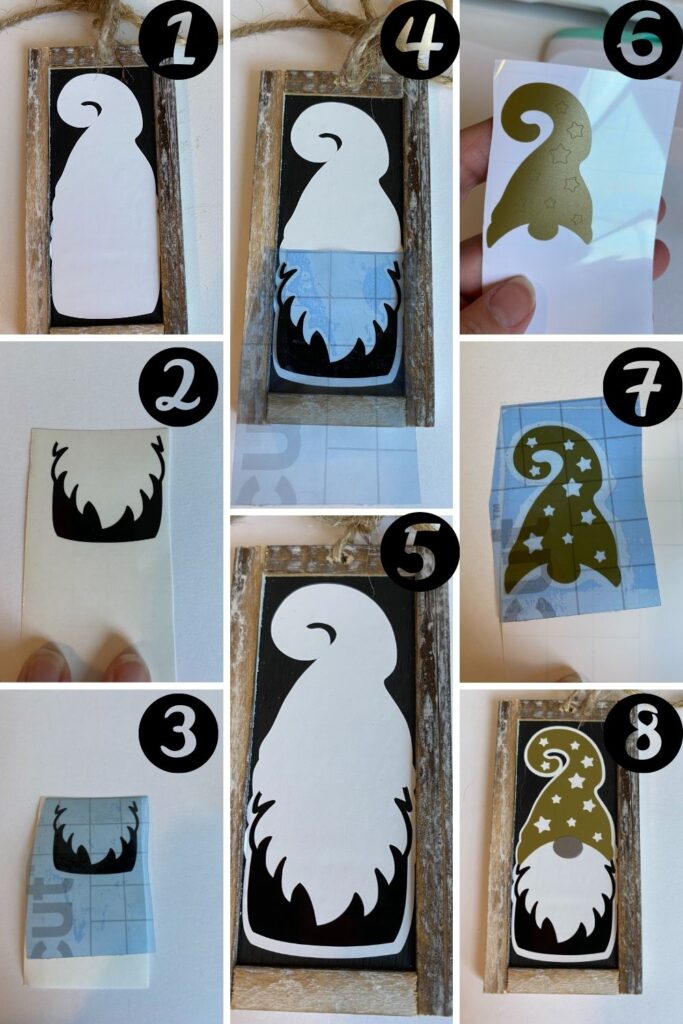
Step By Step: Layering vinyl
- Transfer layer one to the tag using transfer tape.
- Weed out layer two which forms the beard and leave it on the paper backing.
- Lift the beard off of the backing using the transfer tape.
- Layer the beard onto layer 1. Press firmly so the beard sticks and then remove the transfer tape. Go slow and be sure the beard is sticking. You may need to help it along by using your fingernail or a scraper.
- Showing the beard attached.
- This is showing the gold hat with stars still attached. Don’t forget step 7!
- Use your weeding tool to pick out the stars. Throw the little stars away.
- Repeat the transfer tape steps to lift the hat off of the backing and layer it onto the gnome.
- (Step 9 is not pictured) Transfer the nose. You’re done layering 4 colors of vinyl. Not so bad, right?!

Hanging The Ornaments Or Gift Tags
You can see that I used wood beads as an embellishment for the gift tags and ornaments but you can use ribbon, jute twine, or even decorative metal hooks.
I’m going to be making a wood sign with my SVG Gnome Cut File as well! Crafthouse SVG. has great cut files as well. I love to buy their bundles and they give freebies away all of the time. They have several SVG bundles that are 10 bundles for 10 dollars. One bundle will have so many different designs you can use.
Use HOOTSHACK10 for 10% off your purchase! They have a bundle for Christmas Gnomes SVG cut files as well so be sure to get that one!

If you love gnomes, you should check out my ultimate guide for how to make Christmas gnomes and also the best-selling Christmas gnomes decorations.
xoxo,
Denise