Feather Wreath DIY
Feather Wreath DIY
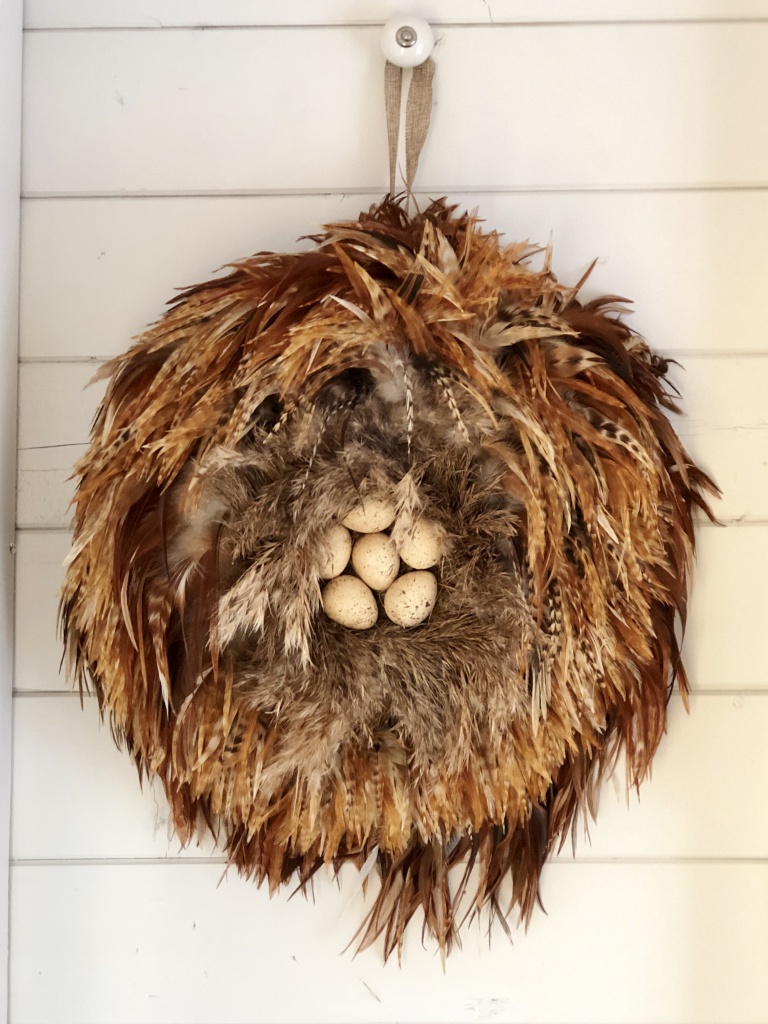
I wish I could take all the credit for this beautiful feather wreath DIY, but my mom is going to get the credit for the idea behind this one! I love all of the rich colors in these feathers but I’m also thinking real hard about making another one in all white! You don’t need much to make this wreath but the trick is to give it some dimension and I’m going to tell you just how that’s done.
Here’s what was used to make the Feather Wreath DIY:
(This post contains affiliate links which means I may make a small commission at no cost to you if an item is purchased.)
- Feather trim
- 2 wreath frames – one smaller wreath and one larger wreath – If you use grapevine wreaths, you can sew them together instead of gluing!
- a nest for the center (eggs are optional or may come with your nest) (similar nest linked)
- a glue gun and glue sticks
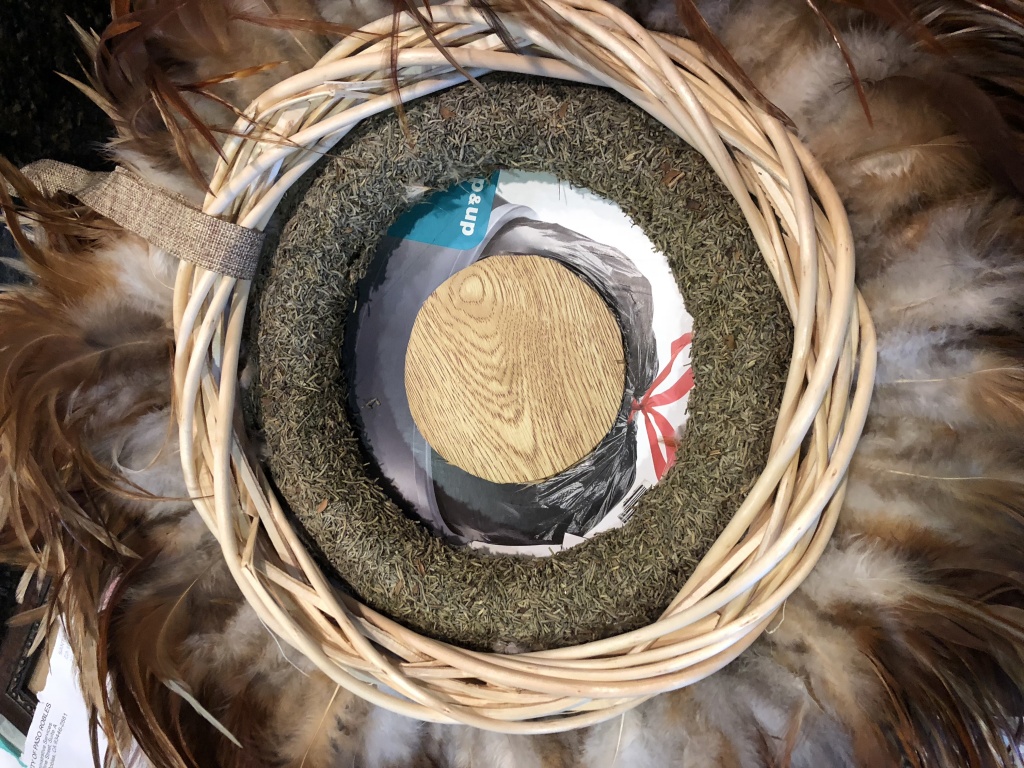
- a small piece of cardboard cut to fit the larger of the two wreaths
Now let’s get started:
First, I cut the cardboard to the same size as the smaller wreath so that it covered the wreath on the front entirely. You can lay the wreath on the cardboard and trace a circle. This gave the surface to glue the nest to in a later step. The larger wreath was not that different in size, so we were able to glue the larger wreath to the smaller one. If the two wreaths aren’t the right size for this, another piece of cardboard can be glued between the two wreaths. Remember, this is to add the dimension.
After the cardboard and wreaths were all glued together, I glued the nest to the front. I then began gluing the feather trim around the nest, working in a circular pattern making the wreath larger and larger until you reach the fullness you want. In other words, you’ll have a couple of layers of feathers by the time you reach the outer edge. If your nest isn’t as full as this one, you may want to glue the feathers first and then glue the nest on top so you can’t see the trim from the feathers.
This nest was made from natural grasses, and the eggs were already attached. If your nest doesn’t have eggs, you can always add them if you’d like.
This photo may be a bit confusing, but this nest was attached to a small piece of wood that you see in the very center, so a hole was cut in the front piece of cardboard so that the wood piece came out the back and could be secured better with glue. If your nest isn’t attached to wood, you can just glue the nest to the front of the cardboard. You can see the piece of cardboard used was the box from trash bags. Cute, right? 😉
I’m sorry I don’t have better pictures of this DIY, but this was written by request after the wreath was completed. If you have questions, please don’t hesitate to ask!
Attach something to hang the wreath with, like a ribbon or twine, or just hang it directly on a nail. This is another quick and easy DIY.
If you’re looking for some new fall decor crafts, be sure to check out a couple of other posts about how to make an easy DIY Fall Garland. You can also learn how to make cute yarn gnomes for Fall or any season.
Happy crafting,
Denise